Libpostal may be a prerequisite for parsing addresses as part of an ISO 20022 Structured Address solution. This article explains how to install and configure it in your development or production environment. If this is Windows, you can either use a containerised solution or use WSL. This article provides instructions for the WSL option.
Aim
This guide is for anyone wanting to use Libpostal in a Python application for parsing addresses, which runs on a Windows OS. Libpostal is written in C and therefore requires a Unix/Linux distribution. On a Windows OS, WSL provides this Unix environment. This guide is focussed on the Python Libpostal package. A Java version is available but not covered here.
This guide covers:
- Installing and configuring WSL.
- Installing and configuring Libpostal on WSL.
- Upgrading Libpostal to the Senzing models.
- Verifying it works by running a basic test application in VS Code.
WSL
Overview
Windows Subsystem for Linux (WSL) allows applications designed to run on Linux / Unix OS, to be run on Windows. This applies to any application built in Java or Python that uses Libpostal. Installing and configuring WSL is a pre-requisite.
An alternative is to build in a Linux or Unix container (not covered here).
Prerequisites
- Windows Version: Windows 10 version 1903 or higher.
- Admin Rights: Required for installation. Request Local Admin.
- Internet Connection: Needed to download Linux distributions.
- Help on installing and configuring WSL – see links at the bottom of this page.
Installing WSL
1. Open an Elevated Command Prompt
- Search for “cmd” in the Start menu, right-click, and select Run as administrator.
2. Install WSL
wsl --install- This command installs the latest version of WSL with default Linux distribution which will be Ubuntu. This is fine unless you require a specific Linux distribution (e.g. see https://ubuntu.com/desktop/wsl – not covered further here). There is a step further in the process to update this default Ubuntu distribution.
- Restart your computer if prompted.
3. Set Unix User Account Name and Password
- The install will prompt you to create a Unix account. This is not related to your Windows account name or password. This account will have Unix admin (sudo) privileges.
4. Summary
- The installation and configuration should complete, as shown here.
C:\Windows\System32>wsl --install
Downloading: Ubuntu
Installing: Ubuntu
Distribution successfully installed. It can be launched via 'wsl.exe -d Ubuntu'
Launching Ubuntu...
Provisioning the new WSL instance Ubuntu
This might take a while...
Create a default Unix user account: domdigby
New password:
Retype new password:
passwd: password updated successfully
To run a command as administrator (user "root"), use "sudo <command>".
See "man sudo_root" for details.
5. Update the Distribution
- Run the following command to update the distribution. You will be asked for your password.
sudo apt update && sudo apt upgrade- It may state additional space will be used, select Y if asked to continue.
Libpostal
Overview
Libpostal is used for parsing addresses. It is a pre-trained ML model built in C. It is best run on Unix, hence requiring WSL. We will install the base libpostal build and then update the model to use the Senzing model.
Prerequisites
- Admin priviledges
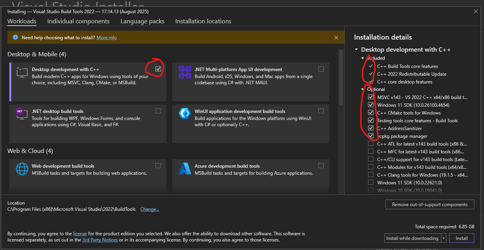
- Install “Build Tools for Visual Studio 2022” Visual Studio & VS Code Downloads for Windows, Mac, Linux . During this installation, select “Desktop development with C++”, see screenshot. Ensure the optional components include “C++ CMake tools for Windows“
- Install Git (if not already installed)
Installing Libpostal
1. Install libpostal C Library
- Open a bash terminal as Administrator and enter into the WSL environment.
USER@MACHINENAME MINGW64 ~
$ wsl
domdigby@MACHINENAME:/mnt/c/Users/<USERNAME>$- Update if needed (recommended).
sudo apt update && sudo apt upgrade -y- Install build dependencies. Select Y if you get any prompts.
sudo apt install -y curl autoconf automake libtool pkg-config build-essential git- Clone the remote libpostal repo from github and build libpostal
git clone https://github.com/openvenues/libpostal
cd libpostal
./bootstrap.sh- Configure the build system
./configure --datadir=/home/$USER/libpostal_data- Build – this may take 5-20 mins
make -j$(nproc)- Install system-wide
sudo make install- Update the library cache
sudo ldconfig- Download the language and address data (approx 2GB – may take a while)
sudo libpostal_data download all /usr/local/share/libpostal- Install Python 3.12 (or the latest available)
sudo apt install -y python3 python3-pip python3-venv python3-dev- Verify python installation
python3 --version
pip3 --version- Verify the installation. Run this command and you should see these directories and files. This includes:
- Address expansions: rules for normalising addresses (St → Street, etc)
- Parser models: ML models for identifying address components
- Language classifier: ML models for detecting the language of addresses
ls -la /usr/local/share/libpostal/

total 44
drwxr-xr-x 7 root root 4096 Aug 20 16:26 .
drwxr-xr-x 8 root root 4096 Aug 20 16:25 ..
drwxr-xr-x 2 root root 4096 Jan  1  2017 address_expansions
drwxr-xr-x 2 root root 4096 Mar 31  2017 address_parser
-rw-r--r-- 1 root root    7 Aug 20 16:25 base_data_file_version
-rw-r--r-- 1 root root    3 Aug 20 16:26 data_version
drwxr-xr-x 2 root root 4096 Jan 26  2016 language_classifier
-rw-r--r-- 1 root root    7 Aug 20 16:26 language_classifier_model_file_version
drwxr-xr-x 2 root root 4096 Jan  1  2017 numex
-rw-r--r-- 1 root root    7 Aug 20 16:26 parser_model_file_version
drwxr-xr-x 2 root root 4096 Jan  1  2017 transliteration
Upgrading Libpostal to the Senzing Model
Overview
You can use Libpostal base model but the Senzing project has updated and improved the model. Details can be found here: Senzing/libpostal-data: Information about libpostal work done by Senzing. Remember to update the data files as required in the future as they are made available.
1. Install Senzing Model
- Open a bash terminal as Administrator and enter into the WSL environment. Navigate to the libpostal data directory.
cd /usr/local/share/libpostal- Backup the existing data (optional but recommended). Enter your Unix account password if prompted.
sudo mkdir -p backupsudo mv * backup/ 2>/dev/null || true- Download the Senzing model files. Do each separately as they are large downloads, particularly the parser.tar.gz. The 3 links can be found here: Senzing/libpostal-data: Information about libpostal work done by Senzing.
- If installing on a corporate machone, connected via your company VPN, it may block these links. You may need to disconnect from VPN or seek support from your IT / DevOps team.
sudo wget https://public-read-libpostal-data.s3.amazonaws.com/v1.1.0/language_classifier.tar.gz
sudo wget https://public-read-libpostal-data.s3.amazonaws.com/v1.1.0/libpostal_data.tar.gz
sudo wget https://public-read-libpostal-data.s3.amazonaws.com/v1.1.0/parser.tar.gz
- Extract the downloaded files
sudo tar -xzf language_classifier.tar.gz
sudo tar -xzf libpostal_data.tar.gz
sudo tar -xzf parser.tar.gz- Remove the tar.gz files
sudo rm language_classifier.tar.gz libpostal_data.tar.gz parser.tar.gz- Set the correct permissions
sudo chown -R root:root /usr/local/share/libpostal
sudo chown -R 755 /usr/local/share/libpostal- Verify the installation. Run the following command to see the list of files.
ls -la /usr/local/share/libpostal- You should see this, which includes the backup directory:
total 32
drwxr-xr-x 8  755 root 4096 Aug 21 16:16 .
drwxr-xr-x 8 root root 4096 Aug 20 16:25 ..
drwxr-xr-x 2  755 root 4096 Jan  1  2017 address_expansions
drwxr-xr-x 2  755 root 4096 Dec  7  2023 address_parser
drwxr-xr-x 7  755 root 4096 Aug 21 16:00 backup
drwxr-xr-x 2  755 root 4096 Jan 26  2016 language_classifier
drwxr-xr-x 2  755 root 4096 Jan  1  2017 numex
drwxr-xr-x 2 755 root 4096 Jan 1 2017 transliteration- You can now run your VS Code or call libpostal to verify it works. If it does, you can safely remove the backup directory.
sudo rm -r backup- Now when you list the files, the backup directory will have been deleted. This should be the final list of files.
total 28
drwxr-xr-x 7  755 root 4096 Aug 21 16:26 .
drwxr-xr-x 8 root root 4096 Aug 20 16:25 ..
drwxr-xr-x 2  755 root 4096 Jan  1  2017 address_expansions
drwxr-xr-x 2  755 root 4096 Dec  7  2023 address_parser
drwxr-xr-x 2  755 root 4096 Jan 26  2016 language_classifier
drwxr-xr-x 2  755 root 4096 Jan  1  2017 numex
drwxr-xr-x 2  755 root 4096 Jan  1  2017 transliteration
VS Code Setup for Libpostal
Overview
Follow one of the many YouTube guides for configuring VS Code for WSL, installing the extensions as required.
Prerequisites
- VS Code installed and configured
- VS Code extensions including WSL, Python, Python Debugger
Running Libpostal in VS Code
- Open VS Code. Open a new window and show the command palette (Ctrl+Shift+P).
- Type “WSL” and select “WSL: Connect to WSL”.
- Create a new python file, say “main.py”
- Create a virtual environment and run:
pip install postal- Add the following code:
from postal.parser import parse_addressparse_address('The Book Club 100-106 Leonard St Shoreditch London EC2A 4RH, United Kingdom')References & Useful Links
- Microsoft WSL Install Guide
- Set up a WSL development environment | Microsoft Learn
- Ubuntu WSL Download
- openvenues/libpostal: A C library for parsing/normalizing street addresses around the world. Powered by statistical NLP and open geo data.
- Senzing/libpostal-data: Information about libpostal work done by Senzing.


